Looking to Buy a Fishing Boat?
Charlotte Harbor Newcomer Fishing Guidance from a Rookie
July, 2012
Cut Bait Fishing by Jim Qurollo
If you are after redfish, one of the best methods I’ve found is to fish cut bait under the mangroves on either side of Charlotte Harbor, around Turtle or Bull Bays and Pine Island Sound. Ladyfish has been an excellent choice for me, but some local fishermen swear by cut mullet, crab chunks or pieces of larger threadfins. Use what you have, but remember that reds like the shade when the tide is in and they can reach it.
Try cutting an average size ladyfish, mullet, etc. into 1” to 1.5” steaks. Use a circle hook of around 5/0 size and hook the cut bait steak from flesh side out through the skin. Be sure and leave plenty of hook point exposed. Normally you would not use any weight because the cut bait steak should be plenty heavy enough to cast easily.
Anchor a comfortable casting distance from overhanging mangroves during incoming high, through high tide or the first part of outgoing tide. Toss the cut bait as far under the mangroves as you can. If your fishing spot has quite a bit of current, you may want some weight added up your leader to keep the bait from washing out from under the shade of the mangroves. Put your pole into a holder, sit back and relax.
When your rod doubles over and the drag starts complaining, grab it, point it about 90 degrees away from the direction the redfish is running—most likely he’ll be trying to get further into the mangroves— hold the rod tip low to the water—to try and keep the line out of the down hanging mangroves—while you pull and reel like hell. If you’re lucky, you get the red out into open water before he breaks you off. I did not mention “set the hook” because with circle hooks, you just want to put a good bend in your rod and start reeling, no hook set necessary or desired.
This sounds like a lazy way to fish, especially if you prefer tossing lures, but some days it is the most productive.
(Back to Content_Links)
The Loop Knot by Jim Qurollo
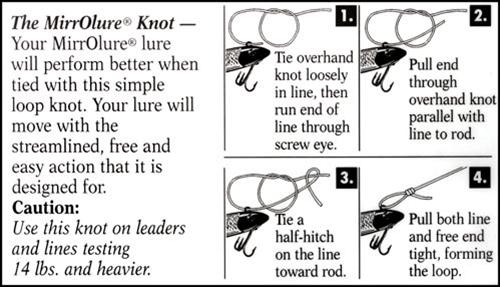
One of the very best and easiest to tie terminal tackle knots for most Charlotte Harbor fishing is a loop knot. A no slip loop knot has some advantages over knots like the clinch, improved clinch, Palomar, uni-knot, etc. Although a loop knot may not be an exceptionally high line strength knot, when using fluorocarbon leader that is routinely heavier than your main line, a loop knot tied to a live bait hook or to most lures gives the bait or lure much better action than a “clinched down tight” knot. A loop knot is almost a necessity for most top water lures like the Zara Spook and similar.
For me, an unforeseen advantage is the fact that, when desired, you can often break the loop knot before you break the line to leader knot (e.g. double uni-knot or Sebile knot) used to tie the fluorocarbon leader to the main line. This can save time when you hang your circle hooked white bait in the mangroves and need to break it loose to continue fishing.
One of the best loop knots is the MirrOlure knot. I’ve used it for years…easy to tie and reliable. Here’s a graphic from Polk Outdoors.com that gives a pretty good illustration of how to tie a MirrOlure knot.
(Back to Content_Links)
August, 2012
Catching Bait by Tom Parsons, Grand Master Angler
But in the spring around April or May, the white bait starts to come into the harbor. White bait is made up of pilchards, scaled sardines, Spanish sardines, and threadfin herring. They are the bait of choice for Spring, Summer, and Fall because that is what is swimming around the harbor and what the fish are eating (not to say that shrimp won’t work). White bait is fairly easy to catch except for the herring which are very fast and do not come to chum as well as the other three, if at all. If they are mixed in with the other three, they usually get caught in the net.
Where do you find this bait ? Normally over the flats in 2 or 3 feet of water. In early Spring they move into the harbor from the South. The first place to find them is usually the flats off Jug Creek, or the flats around three Sisters. Then around markers 1 and 2. They will show up at Burnt Store Marina flats and Alligator creek flats. Patrol slowly over the flats looking for schools of fish about 3″ in length, or flashes in the water. If it is a calm day, you can see them flickering on the surface. You can use your electric motor to slowly move up to within about 10 feet, and throw your castnet over them. Pull them into the boat and into your livewell.
If you can’t find them on top, troll around the flats looking for flashes, flicks, or a couple of them swimming around. Stop, anchor up current of them, and chum a school up to your boat.
How do you chum? First go to the feed store on Rt. 17 about 2 1/2 miles on the left past the I-75 overpass (Crossties Farm & Garden). They sell Tropical fish food in 1 lb. plastic bags, this is a terrific chum that these baits will follow right up to the boat. You mix up a fist full of fish food in a container and add just enough water to make small mud balls that you toss into the water and let the current carry this chum line back to the bait. Throw enough mud balls to attract all surrounding bait. Menhaden oil works better than water by creating more slick. Throw the first ball out as far as you can, if it just blows in the wind, it is too dry and it needs water. Each time you throw out, make your throws shorter and shorter until you bring the bait school into your throwing range. If you do catch some threadfin herring in your net you will find them dying in your livewell, because they are not as hearty as the other white bait.
During this hot weather, the bait will tend to die faster, so freeze a bottle of water and put that sealed bottle in your livewell, it will keep the water cooler, and the fish livelier.
(Back to Content_Links)
Looking To Buy A Fishing Boat? by Bill Guenther
(Not All Boats Are Alike!)
When looking to buy a boat, keep in mind there is no single boat that will be suited to all the kinds of fishing that is available in Charlotte Harbor and the off shore reefs. So what is recommended is that before you spend a ton of bucks for a fishing boat think about the kind of fishing you are interested in.
If you are going to want to fish inside the bars and the mangroves for redfish and snook, you’re probably going to want at a flats boat. If the flats boat is equipped with a trolling motor and a jack plate (a mounting device for an outboard motor that enables operators to vertical raise or lower the motor) so much the better, but you do not need a jack plate to fish the flats, it just comes in handy on occasions.
A center console is another consideration. My boat for instance allows me to fish most areas of Charlotte Harbor and also allows me to run out to some of the close in-shore reefs, such as Trembly Reef, a artificial reef about 6 miles off stump pass and a quick 20 minute run back into Gasparilla Pass if bad weather closes in.
My center console will not let me get in too close to the mangrove shorelines on the inside of the bars due to its draft being not as shallow as a flats boat. But I can get into about 19 inches of water with the motor tilted up, and if I need to get closer to the Mangroves I’ll get out and walk!
There is not much difference in a bay boat and a center console vessel. In my opinion, bay boats are meant for inland/near shore waterways and usually have a shallower Vee in at the stern (less deadrise- around 15 degrees). Regular center consoles usually have a deeper Vee (more deadrise- 18 to 20+ degrees) for a better ride in bigger water, and higher gunwales with more flare at the bow. I always thought of bay boats to be the salt water equivalent to a bass boat.
So that’s a quick look at some of the things to consider when going out to buy a boat you intend to use, for the most part, in fishing Charlotte Harbor and the near shore reefs.
Stay safe and let’s go fishing!
(Back to Content_Links)
September, 2012
Catching Bait (Part 2) by Tom Parsons, Grand Master Angler
To recap Catching Bait part 1 from last month’s newsletter, I wrote about catching white bait using a castnet.
One great way to disorient and throw bait out a distance is to buy a wiffle bat for a dollar at Wal-Mart and cut the wide end off at a 75 degree angle. Put your bait in the open end, put your hand over the opening and shake the bait around. Grip the handle of the bat and throw the bait into the area you want to fish. If you see the bait spinning around in the water they will attract fish. But if you see the bait swimming back to the boat, then they have not been shaken enough. That’s it for live bait!
If anyone has any questions about bait, or where to get tropical fish food, see me at the meeting or call me.
(Back to Content_Links)
Shark Fishing Novice Style by Joe Udwari
(Editor’s note: This article was written by Joe at the end of July after his numerous shark fishing trips trying for our July Fish of the Month. It wasn’t submitted in time to be included in the August Newsletter. It is entertaining, and even though Joe is an admittedly novice shark fisherman, he makes good points that even some of our Grand Masters might appreciate. He must have learned his “lessons” well…he and Karen won 1st and 2nd place in the July contest.)
Our July guest speaker Robert Lugiewicz told us a lot about how and where to catch shark in Charlotte Harbor. He did a great job as far as I’m concerned, but there’s only so much information you can squeeze into 45 minutes without eyes glassing over. For me it served as a foundation upon which to build, using both on-the-job training so to speak, and follow up visits to Fishin’ Frank’s Bait & Tackle for consultation with Robert and Fishin’ Frank. Here are ten lessons learned that might help you in your quest for ‘catching’ shark, especially shark over 5 feet in length. I stress catching, since the hooking part is a lot easier than the landing part. You guys and gals wearing the teal Master Angler shirts can skip this read since you’ve already proven yourselves. Alternatively, you can read this and set me straight with constructive feedback and things you’ve learned over the many years of fishing in Paradise.
I figured I’d give our July shark contest a shot by trying my luck. I fished a total of seven days over a 2 week span, including five days with my wife (quality time). We wound up catching 77 documented shark (forgot to or couldn’t take pictures of about 6), and lost many others, including some big ones. About 9 shark or 11% were big ones (i.e., over 5 feet), but only one of those was ‘caught’–the very last fish on the last day of the contest; a Lemon Shark with fork and total lengths of about 7 and 8 feet, respectively. I still can’t figure out how anyone can measure a big live shark in the water with any precision, but I’m still a novice.We fished the Middle Hole (two days with 6 shark–four of which were Scalloped Hammerhead and two Blacktip), the Pirate Harbor hole (1 day with one Blacktip shark), and points south, which I’ll call the Harbor Triangle Area formed by Cape Haze, Bokeelia and Burnt Store Marina (four half-days with over 70 shark–47+ Blacktip; 21+ Atlantic Sharpnose; 1 Scalloped Hammerhead; 1 Lemon; and several 3 to 4 foot Southern Stingrays). Just like Robert said, the further down the Harbor the better due to the higher salinity. Winds were generally SE to SW at less than 8 knots. Tides were mostly incoming and water temperature was about 89 degrees F, or just a few degrees below air temperatures. It was hot and muggy!
We used a hodge podge of gear and tackle; some new, some old, some spinning; some conventional bait casters; 7 and 8 foot medium to heavy action rods of various makes; some old mono 40 pound test line; some 65 and 80 pound braid line; 40, 60 and80 pound mono and fluorocarbon leaders; some homemade single strand wire leaders with 5/0 and 6/0 hooks; some of Fishin’ Frank’s plastic coated multi-strand wire leaders with 7/0 hooks (highly recommended); and some cheapie multi-strand wire leaders from a big retailer (not recommended). You likely get the picture by now. Anything I had accumulated over the years I used; even 25 year old monofilament line and right handed bait casting reels (I’m a lefty).
· The worst rod and reel combo will get hit by the big ones. Out of 4 lines in the water, my worst spinning combo is the only one that got slammed by the big ones; the reel with the sticky drag. The spinning reel base even broke and I was considering retiring it. Instead I used a hose camp to attach it to the rod since it was attracting the big ones. Guess which combo caught (just barely) the Lemon.
· Your best efforts to remove potential weak links like line to line knots will fail.
· The 80 pound mono leader is necessary for abrasion resistance. The tail of a big one will cut 65 or even 80 pound braid tied directly to the steel leader like a hot knife through butter. Forty and 60 pound leaders won’t work unless Murphy is sleeping, but he never does.
· A well tied triple surgeon’s knot or a double uni knot will work just fine. Note that I said well tied. If you don’t think it’s a good knot and will hold up, re-do it until it’s right even if you don’t want to because of rough seas, wind gusts or adrenaline induced quivering hands.
· When using braid, double it, or it will cut through your mono leader when tugged on by a big shark.
· Fluorocarbon isn’t necessary for shark, especially in stained water.
· Line to line knots between mono leader material and mono line were less problematic than those tied with braided line. The braided line also had a greater tendency to get buried in the spool under the pressure of big fish, especially with the reels having old or cheap drag systems. I’d say the old mono line performed better than the braided line in this situation, even though I consider myself mostly a braided line type.
Cheap wire leaders will make you cry, as will weak hooks that bend/open like sesame. They will be bitten through or the wire wrap will pull out or unravel. Thin gage single strand wire will pull through big hook eyes. Two to three foot plastic coated multi-strand leaders with double crimped ends like those sold at Fishin’ Frank’s will hold up, period. Joined to a six foot 80# mono leader will get you 8 to 9 feet of protection for your line.
· Not flattening or depressing your barbs on the hooks is silly. You simply don’t need them, and as Robert stated, if you don’t, you’ll have a tough time unhooking your catch. The one barb I forgot to flatten cost me multiple lacerations in three fingers, compliments of just a 3 foot Blacktip.
Lesson #2: Four rods in the water is a bit much for one person (if the fish are active). An OK number for two people, but there will still be tangles. One free line, one on a bobber and one weighted is doable. During slack tide or when sharks were near the boat, the bobber worked the best at about 4 feet above the bait whether in 10 or 20 feet of water. Otherwise, the free line worked best for shark, and the weighted line (3/4 to 1 ounce sinker) caught lots of gaff topsail catfish.
Lesson #3: Simplify and use quality gear, with quality tackle that is properly rigged. As noted above, the knots are important, as is the use of an abrasion resistant leader of at least 6 feet, and strong forged “J” hooks with barbs depressed. Get the best gear you can afford, and keep it as consistent or monochromatic as possible. When you do purchase gear, support the local shops, especially those that gladly spend countless hours educating us.
Lesson #4: You can’t chum too much, but keep the tossed out chunks small or fine to serve only as teasers or appetizers or they won’t bite your baited hooks. Use catfish by-catch as chum and bait, but cut off their spines before doing anything. Fish heads are dynamite bait for big sharks, perhaps even better than whole live fish. Remember, I’m a novice so I don’t know what I’m talking about. I do, however, now know that cut-bait fishing is messy and kind of brutal, but also thrilling. Just keep the boat tidy as you go to not get grossed out too badly and to make the cleanup back at the dock a lot easier.
Lesson #5: Invest in a good anchor. After spending considerable effort and time to establish a nice chum slick, it’s very frustrating to lose anchorage and drift away from your spot. Place a waypoint on your GPS and check your position regularly. That’s a great reference point to see if you’re holding ground, and also an easy way to get back to your spot after tossing the anchor rode to chase a big fish.
Lesson #6: Allow one to two hours to catch a dozen live ladyfish or Crevalle Jack bait before shark fishing. Have some frozen baitfish along just in case. Murphy is also present while bait fishing. As for chum blocks, I developed a preference for the Professional grade blue box; it is a finer grind and has added scent. You’ll need a mesh bag, however, since it doesn’t come with one. It’s also a good idea to salt down any leftover ladyfish for a few hours before freezing. That firms them up and they become way less mushy and are better for use as bait on your next trip (another great tip from Robert).
Lesson #7: Practice the fire drill that ensues when hooking a big one. Reeling in other lines, unhooking the anchor (make sure you have floats attached to your rode), starting the outboard or deploying the trolling motor in order to chase the fish before getting spooled, etc….I’ve never before seen 250 yards of line peel of a reel in less than a minute. That’s not much time to think; barely just enough time to implement your well rehearsed drills.
Lesson #8: Shark have a mean streak, don’t like being caught or handled, and are vindictive. After releasing the Lemon shark, it swam about 10 feet away, turned around and came back to bite my boat, leaving several gouges and puncture holes in the gel coat and fiberglass hull. I thought these weren’t aggressive shark. Just glad it wasn’t my arm while measuring it. You can never be too careful.
Lesson #9: Be very careful swimming in or around the Harbor Triangle Area. Yes, people were swimming off their boats near our chum line, likely to cool off. If the shark don’t bite you, the huge jelly fish we saw could put a damper on your day.
Lesson #10: At an average of about $60 per trip including gas, chum, tackle and supplies (excluding band aids, boat repair, a new rod and a soon to be purchased new reel), these lessons weren’t cheap, but great fun. The trips provided us with beautiful scenery and encounters with dolphin, manatees, sea turtles and all kinds of birds. Oh yeah, also shark and time with the spouse, which we all know is priceless.
Hope this is of some use to a few of you and saves you a little time, money and aggravation. If not for fishing than perhaps to cure insomnia. I think this proves that novices can even catch shark with a little knowledge and a whole lot of luck. Happy fishing and be safe!
(Back to Content_Links)
Charlotte Harbor Newcomer Fishing Guidance from a Rookie
by Joe Udwari
INTRODUCTION
I was recently fishing with our club’s newsletter editor Jim Qurollo and he suggested I write another article. Getting more of our experienced anglers in the club to put their knowledge down on paper to help out the newbies has been a challenge for the Board. I’m sure it’s not because they don’t have pens, paper or PCs, but instead because they’re always busy fishing to perpetually hone their skills. Can’t hardly blame them with paradise all around us. So I thought that by taking a crack at documenting what I (a rookie) learned from my first year of fishing here might be of some use to newcomers. This article might enrage our experts sufficiently enough to drop their gear for a bit and start writing to: 1) set me straight on what really works and is useful; and 2) provide expert advice on any number of relevant topics for both newcomers to our club and those of us in need of more guidance to improve our productivity on the water (catching instead of just fishing).
I made an outline of key fishing/boating things I wanted to know when I first arrived in PGI. The list is not all inclusive and my knowledge is still limited in many areas. That’s my disclaimer, so proceed at your own risk using common sense with safety instead of just fun at the forefront. There are no guarantees expressed or implied herein, but it’s a stab at what you may find useful in coming up the learning curve of saltwater fishing in our area a bit quicker than I did.
OVERVIEW
Lots of us have fished freshwater, or have saltwater fishing experience from elsewhere. Some of this experience is transferable, but much is not. The same can be said for the gear we already own, but instead of running out and getting all new stuff, you may wish to use what you have for a while and supplement it as your experience and interest progresses. Just make sure you gently rinse it with fresh water after every use and thoroughly clean and lubricate it at least twice a year. Also minimize the gear stored on your boat, since the corrosive marine environment will quickly rust most metals and the predominantly hot and humid weather will colonize your toys with fuzzy mold and/or mildew.
The focus of this guidance is aimed at fishing Charlotte Harbor (the Harbor) and its readily accessible tidal tributaries from a power boat. There are numerous wading, kayak, pier and shore fishing opportunities as well, and freshwater lakes, ponds and streams. These and offshore fishing in the Gulf of Mexico could be the subject of future articles in our newsletter (hint-hint).
1. Objective
First you need to define your objective and identify what’s important to you. Simply stated, mine is to have fun by catching many species in and around the Harbor, and then letting them go. I’m not particularly looking for table fare, but mostly fish for the sport. I fall into the 90% fishing/10% pleasure boating category. My experience until last year was mostly fresh water fishing for bass, pike, walleye and musky. I occasionally fished saltwater for bluefish, stripers, sea bass, sailfish and salmon on charter boats and head boats. Therefore, I had amassed a variety of gear ranging from ultra-light spinning gear to heavier rods equipped with bait casting reels, with a few fly rods in the mix (don’t tell my wife about all of this hardware). I left my 17 foot aluminum ‘bass tracker’ in storage up north since I believed it was not a good match for the Harbor (I was right). Besides, it gives me an excuse to make an annual northerly trip to check on my boat and chase Muskies.
So I needed a boat down here, and lots of knowledge as to where and when to fish, what to use, and of course, a fishing license. Carefully check out the Florida Saltwater Recreational Fishing Regulations which are published biannually by the Florida Fish and Wildlife Conservation Commission (FWC), and updated/revised periodically on their website. Do this frequently, especially if you keep fish, since changes to limits and open seasons sometimes occur for no apparent reason.
2. Boats
Type and Motor – When I first inquired, I was half-jokingly told I needed 3 types of boats to thoroughly fish this area; a flats boat, a bay boat and a deep V offshore boat. I believe the most common fishing boats in the Isles are 20 to 24 foot bay boats, since they let you target all of the species most of the time throughout the year (I have no statistics to prove this). After lots of research and consultation (i.e., bargaining and pleading with my wife), I picked a new 22 foot bay boat with an 8.5 foot beam and a draft of about a foot. My understanding is that boats drafting more than 14″ severely limit one’s opportunity to fish the flats. It is also equipped with a jack plate, trim tabs, shallow water anchor, trolling motor, global positioning unit (GPS)/charting device and VHF/DSC radio. This allows me to get into and out of shallow water (i.e., on the flats or up the river) most of the time (I keep a paddle onboard just in case), get a reasonably comfortable and dry ride in the usually somewhat choppy Harbor, and in the future, hopefully get a little bit offshore when the weather allows. Before I wrote the check for my boat, I spoke with a well respected local guide who fishes out of a 24′ boat of the same make and hull design as mine (Skeeter ZX22Bay). His boat performance description was spot on, including his comment that when the wind is blowing more than 20 mph, it’s best to stay home.
Although I was leaning towards a 4 stroke 150 horsepower (hp) outboard since I didn’t have a major yearning for speed, I wound up with a 4-stroke Yamaha 200 hp V-6 SHO instead, and am glad I did. I had read online that some boat owners regretted being underpowered, by saving a little money up front. Although a bit less fuel efficient (i.e., about 3+ vs. 4+ miles per gallon), the extra power gets me on plane quickly in shallow water when I’m carrying a heavy load and lets me outrun bad weather more often. With my 4-blade 14.25×17 Stiletto Bay Pro III prop, I get on plane in about 3 seconds and achieve a top speed of 50 mph at 5300 rpm. I typically cruise at 37-40 mph.
I stress that I wanted mostly an inshore fishing boat, and not so much a sightseeing boat for visitors. Although I got a Bimini top for the latter use, I keep it off the boat when fishing since I find it’s mostly in the way. A T-top would be nice for some shade/shelter, extra storage and the mounting of spreader lights/antennas, but I’ve become accustomed to unobstructed casting. For more information on selecting boats, refer to an archived article on our club’s website.
Launching and Storage – I’m fortunate to live on a canal with a boat lift so that’s where my boat rests. Very few in PGI keep their boat in the garage, although that is an option, and launch for free at Ponce de Leon Park or Laishley Marina. Several storage yards exist in or near Punta Gorda for storing boats and/or boat trailers. Unused docks and vacant lifts at private residences in PGI represent other options for boat storage.
Fueling and Maintenance – It was recommended to me to use 90 octane non-ethanol (i.e., Rec 90 fuel) gasoline, although Yamaha says I can use unleaded 87 octane regular gas with no more than 10% ethanol. Because of reports I read and stories I heard of problems with fuel tanks, fuel lines and injectors when using gas containing ethanol, I opted to run only non-ethanol gas. The affinity of ethanol gas to attracting moisture in the fuel tank and possible phase separation, if not properly treated with additives, led me to this decision. Mixing of ethanol and non-ethanol gas is also never recommended by mechanics with whom I spoke. I also understand that due to its higher energy content, the higher cost of Rec 90 fuel may be somewhat offset by slightly better mileage performance compared to 87 octane regular gasoline treated with additives. I’m also no expert on this, so do your homework and decide for yourself what’s best for your boat and wallet, since there seems to be no consensus on this subject in the boating community.
Although the marinas on Alligator Creek, at Fishermen’s Village, Laishley Park and Burnt Store sell non-ethanol gasoline, I prefer to haul my gas from land based gas stations in Punta Gorda and Port Charlotte for cost savings of about 10 to 20%. Since I typically use less than 18 gallons per trip, it’s not a big hassle for me to refill my tank. Another option for bulk sales includes pumper truck delivery to one’s home.
Some maintenance service is available on the water at one’s home, obviating the need for a trailer to bring the boat to the shop. Alternatively, service shops can pick up your boat from a marina if you don’t have a trailer.
Canal Etiquette and Rules – Operate your boat at idle speed to keep your wake to a minimum, which usually is 900 to 1200 rpm, depending on the boat and tidal flow. Don’t worry, people will come running out of their homes to let you know when you’re ‘speeding’. Read the warning signs leading into the canals, since idle speed begins at differing distances from shore at various entrances. For example, at Bass Inlet you can be on plane until the last channel marker, whereas at Ponce Inlet you must idle on in from the first channel marker. Also watch out for unattended fishing lines hanging off docks in the canals. Although not allowed, it happens occasionally. Don’t cast net for bait in the canals, and don’t fish off other people’s snook lights. I understand this used to be forbidden, but is now legal (albeit undesired by owners of the lights).
3. Harbor Features
Charlotte Harbor covers an area of about 270 square miles with many hundreds of miles of shoreline. It’s average depth is likely less than 8 feet, and lots of fishing occurs in 3 feet or less of water, plus or minus 2 feet for tidal influence. Depending on wind direction, water can also be pushed out of or into shallow areas, so be cognizant of the actual vs. reported water depth in a given area. So if you want to fish from your boat inside the bars on the flats, around the islands (i.e., keys), or in feeder streams for snook, redfish, seatrout, snapper and a number of other fish, you need to have the ability to get shallow. You must propel your boat quietly with a push pole or trolling motor in shallow water so as not to spook weary fish or damage sea grasses. Much of the Harbor is designated by Florida as Aquatic Preserves, for the protection and preservation of this valuable natural resource.
Fortunately, much of the Harbor bottom is sandy, so damage to your hull or outboard is most often avoided if you get too shallow and run aground. However, there are oyster bars which are not as forgiving. Therefore, you need a good chart and GPS, and proceed with caution until you have a feel (no pun intended) for the area.
Outside the sandbars flanking most of the Harbor shoreline, there are several deep holes, as well as a few artificial reefs. All of these areas outside the sandbars are readily fishable from deeper draft boats. Ladyfish, snapper, grouper, Spanish mackerel, cobia, shark and tarpon are some of the species that can be caught at these locations. Water depths up to 22 feet occur in these areas, and depths up to about 50 feet occur in Boca Grande Pass. Several other species of fish can be caught in the Harbor, which always makes it exiting when headed out for a trip. In addition to fish, enjoy the bountiful wildlife including but not limited to porpoises, sea turtles, bald eagles, ospreys, pelicans, alligators and manatees. When boating in shallow water, always watch out for manatees, and report any boat strikes or injured manatees to FWC. When boating above the Route 41 bridge, a manatee zone extends 1000 feet from shore within which idle speed is required.
4. Resources
As mentioned above, a good chart and GPS is essential for aiding in the safe navigation of the Harbor. I rely mainly on 3 charts made by Waterproof Charts, Inc.: #01E (Charlotte Harbor and Pine Island Sound); #04E (Peace River/Myakka River); and #01F (Charlotte Harbor/Lemon Bay). Because stuff happens, I also recommend having a membership with a towing service for those days when you’re distracted or a bit too aggressive and get grounded, or just plain break down.
Boat U.S. and Sea Tow both cover the area adequately, and offer an extra month of coverage for a yearly membership to fishing club members. The membership fee is well worth it, since without it, you could spend ten times the annual fee for one emergency assistance call (that’s what my friends tell me anyway). As the saying goes, you haven’t fished the Harbor until you’ve run aground, since bars and mounds continually shift with severe storms. Therefore, since it’s a “when” and not “if ” situation, I usually fish with family members or good friends, so when I do get stuck, they can get out and push and save me the embarrassment of hailing SeaTow.
There are four free publications available at the bait and tackle shops around town that I regularly peruse for information. They provide interesting and mostly timely information on locations, equipment, techniques and meteorological data, and are written by local guides or experts in their respective fields. These are Waterline (a weekly section of the Sun newspaper), and 3 monthlies: Water Life for Charlotte Harbor and Lemon Bay (published by the Charlotte Harbor Reef Association); Coastal Angler Magazine – Fort Myers Edition; and Onshore-Offshore Magazine.
Very detailed and specific information can be obtained from the staff of local bait and tackle shops such as Fishin’ Frank’s, Laishley Marine and Rio Villa Bait and Tackle. Fishin’ Frank’s in Port Charlotte also maintains a detailed website listing numerous fishing spots and select annotated maps and aerial photographs, recent catch reports and all around fishing tips. They also offer a monthly free seminar that is very well attended, especially by newcomers to the area. I’ve found these seminars to be extremely helpful, as well as the staff’s willingness to offer one-on-one consultation needed for catching a particular species.
I also rely on several smart phone Apps for tidal, weather and overall fishing efficiency data. There are many available, and some are free. In addition, I take several other FWC resources on boating and fish identification with me. These are: The Florida Boater’s Guide (a handbook of boating laws and responsibilities including an abridged fish ID guide); Fishing Lines (an angler’s guide to Florida’s marine resources and fisheries including great color photos of numerous species); and A Boating and Angling Guide to Charlotte Harbor (a waterproof map of the Harbor with fishing and boating annotations and listings of important phone numbers, boat ramps, marinas, and reef coordinates).
Members of the club and club activities have helped me immensely in learning about fishing Charlotte Harbor. Most will share their knowledge willingly, except for perhaps their last resort go-to honey holes. You better have something of great value to offer up in trade to get that kind of information. Getting an opportunity to fish with the club’s gurus on your boat or theirs is even better, so you can actually see them in action. Just be willing to split their expenses and/or offer up some other incentive to make this happen (perhaps an all expense paid Caribbean cruise might work).
Guest speakers mostly consisting of local guides and charter boat captains also provide useful tips during our monthly meetings, as do conversations with all members at these meetings and at the Friday breakfast.
The Master Anglers of our club (teal shirted guys and gals) really know their stuff, and have proven themselves by catching at least 23 species and collecting at least 2000 points by catching quality/trophy fish during their Ladder of Achievement process. However, there are many other members who also know their stuff, but for various reasons (e.g., don’t take pictures of their catch, forget to submit pictures to the club, etc.) don’t yet have that title. What I’m saying is there are lots of people in the club that can be of help. You just have to reach out to them.
5. Fishing
If you’re still reading, here’s the fun part. You know of course that this could become a book or a 6 week seminar session. I actually took such a course at our civic center taught by Captain Ralph Allen who runs the Kingfisher sightseeing and charter fleet at Fishermen’s Village, and is a regular author of articles in Waterline. Well worth the $40, and highly recommended. So it goes without saying, that I need to hit the highlights and be cryptic to get all this in our newsletter.
Gear – All around, I believe the most popular combo is a 7 foot spinning rod (medium to heavy power with a fast action tip), paired with a 3000 to 4000 series spinning reel, spooled with 15 to 20 pound test monofilament (mono) or braided line. This is typically tipped with a 3 foot long 25 to 40 pound test fluorocarbon or mono leader depending on where you fish (lighter on the flats and heavier in the mangroves or barnacle encrusted piers and pilings). Terminal tackle is kept to a minimum. Although our water is stained with tannic acid from decomposing vegetation, it is mostly clear and therefore most fish are tackle shy. Obviously, depending on the species you’re after and the challenge you want, you can go with ‘lighter’ or ‘heavier’ combos and line, but the above recommendation will work well for many of the fish in the Harbor (e.g., redfish, snook, trout, juvenile tarpon, cobia, tripletail, flounder, jacks, pompano, Spanish mackerel, bluefish, ladyfish, catfish, and smaller rays and shark). These combos will allow you to cast both artificial lures and live bait. Not many people use bait casting rods and reels here. Although I do use them for improved casting accuracy when I throw lures, they are not that useful for casting live bait, however.
For larger tarpon, shark and other bigger fish, heavier gear is typically used, with longer and heavier test leaders (60 to 100 pound test) and also steel leaders for those large toothy predators. Eight foot heavy power fast action spinning rods with 8000 to 9000 series spinning reels are typically used, as well as conventional level wind or bait casting reels spooled with 50 to 80 pound test line. This is primarily needed to more quickly land these larger fish in a timely manner without exhausting them in the usually warm water, thereby increasing their survival rate upon release.
Sometimes swivels are needed to minimize line twist, especially when fishing with bait in fast moving water. Barrel swivels between the line and leader material work well here, and also provide a stop for egg sinkers when weight is needed to reach the desired depth in the deeper holes or next to big bridge piers. Snap swivels are generally not used to attach lures or hooks to the leader. Most often loop knots are used for this purpose (refer to an archived article on our club’s website for tying a loop knot).
Other knots most commonly used for attaching lures are the improved or double clinch knot. A uni to uni knot or triple surgeon’s knot are widely used to attach the mono or fluorocarbon leader to the fishing line, and a haywire twist is useful for attaching single strand wire leader material to barrel swivels and hooks. Multi-strand wire leader material is mostly attached to hooks and swivels with crimps.
Many lures are available on the market, and most are better at catching anglers than fish. Believe me, I know from personal experience. In my opinion, only a handful are needed for catching fish in a variety of conditions:
Topwater lure such as a Rapala Skitter Walk or Heddon Zara Spook
Floating or suspending hard or soft twitch bait such as a MirrOlure MirrOdine, Sabile Stick Shad or D.O.A. shrimp
Lipped crank bait such as a Rapala X-Rap or Maverick
Gold or silver spoon such as a Johnson Sprite or Red King
Small assortment of soft scented plastics such as D.O.A. jerk baits, MirrOlure Lil John or Berkley Gulp! baits, attached to a 1/8 to 1/4 ounce jig head or rigged weed less on a 4/0 to 5/0 hook (weighted or un-weighted).
Lure sizes from 3 to 5 inches work well, and dark and light color patterns are best for dark and bright conditions, respectively. My favorite lure colors are black before and after sunrise, and chartreuse during the day.
If you plan on catching whitebait or mullet yourself, you also need a cast net and chum. I once again refer you to the club’s website of archived articles for detailed information on this.
Finally you need some tools for landing and handling the fish to minimize hurting the fish and yourself. I was in the emergency room in less than a month of fishing here, by trying to unhook a puny little and squiggly ladyfish from my twitch bait without proper tools; a $750 mistake. A landing net, a Boga or other lip grabbing tool, a long handled pair of needle nose pliers (or two), a hook removal tool, wire/hook cutters, a knife, scissors, gloves, a tape measure, a camera, a first aid kit and a flashlight. If you go offshore, you also need a venting tool. Trust me, I now use most of these tools regularly, except perhaps the tape measure and camera.
Bait – When bait fishing with live shrimp, white bait (i.e., a variety of minnows such as threadfins, greenbacks and sardines), crabs, small non-game fish species (i.e., pinfish, sand trout, finger mullet, etc.) and cut bait, you need an assortment of hook sizes and styles. Be careful not to use live or cut fish for bait that have FWC size and creel limits since it’s illegal. Refer to the archived ‘Cut Bait Fishing’ article on our club’s website for more information.
The key is matching the hook size to the bait size and fish you’re after, and deciding if you want to set the hook (J hook or Kahle style), or not (Circle hook or Kahle style). When fishing for table fare classified as reef fish, you are required to use circle hooks to greatly minimize gut hooking and killing fish that don’t meet the size limits. I mostly use number 1 through 4/0 hooks for inshore fishing. For bigger fish like Tarpon and Shark, I typically use hook sizes up to 8/0, especially when using live 8″ plus size ladyfish, finger mullet, jacks or catfish, or just big chunks of cut bait (refer to the club’s website for an archived article on shark fishing). You also need a variety of split shot weights and bobbers or poppers to compliment your style of bait fishing. While free lining bait is common, fishing at controlled depths in the water column can sometimes be more productive. Frozen bait can be bought year round, while live shrimp are more readily available during the cooler weather months and white bait is more readily catchable in the harbor during warm weather months.
When, Where and How – This is the toughest nut to crack, but even visually impaired squirrels find a nut every now and then. Tide probably trumps everything, with moving water being critically important to trigger most fish into feeding or attracting them to you via a chum slick or plume. Add a bit of wind blowing in the opposing direction, and it can get quite difficult to properly present your offering. But if you’re not out there with a line in the water, you’ve got no chance at all. So do your best and hope some luck is also on your side.
Sunup and sunset are also good times to fish, especially when it coincides with good tides and sufficient water depth where you want to fish. Night fishing at bridge piers and abutments can also be productive since these represent good ambush points, especially during full and new moon phases. Solunar tables and the Fishing Calendar App by SIS Software can help you figure out the most productive fishing days and times, and work fairly well. But be careful if you’re out at dark, since crab pots often litter the Harbor and some boats anchor off without appropriate lighting (navigational hazards to say the least).
At high tide and/or sunny weather, fish tend to hide among the Mangrove roots under overhanging branches, so you have to draw them out with chum or cast into deep cover. That’s when heavier line and leaders are needed to either get unstuck or reel out the hooked fish without breaking off. As the tide moves out, so do the fish. That’s when the potholes and troughs on the flats can be your best bet. Potholes are lighter colored circular shaped features of several feet to tens of yards in diameter, that are a little deeper than the surrounding generally darker grassy covered bottom. Remember, since you’re fishing in shallow water, a 6 inch depression may represent about 20% of the total water column, which is a substantial drop. Its effect on holding fish is much greater than a 6″ drop in a 30 foot deep northern lake bottom.
As the tide moves out further, so should you, unless you want to make your soon to be ex-friend get out and push or begrudgingly call Sea Tow (if they can even get to you). During lower tides, fish outside the bars, the reefs, the deep holes or at main channel markers. If you’re lonely and want company, you can always fish Marker 6, since one of our die-hard fishing members Mike Gilger is usually camped out there catching all sorts of fish.
When all else fails and you just can’t find a place to get away from a nasty chop and howling wind, try the PGI canals, especially those directly off the Harbor, or the perimeter (rim) canal. Other spots in the Harbor for targeting certain species are identified on Chart #01F referenced earlier, and on Fishin’ Frank’s website.
Casting lures and drifting or soaking bait are generally effective methods for catching most species. Although trolling is another technique, it is more commonly used offshore and around reefs. For casting, retrieval speed is generally regarded as the most important factor. Many articles talk about slowing it down, especially during colder and hotter water temperatures. I’ve heard that below 70 degrees Fahrenheit, go very slow. Shrimp is an especially good live bait during colder water temperatures. Above 80 degrees, also go slow. Soaking cut bait is a good choice when fish are lethargic due to high water temperatures. In between, use a faster lure retrieval rate and/or cadence, or bait fish, since your quarry is more likely to be active and ready to chase down your offering.
CONCLUSION
There’s a lot to learn in adapting your skills to fishing the Harbor, but it can be great fun and a rewarding experience. Give it time and make wise use of all available resources, and help support the local shops that provide us with valuable fishing information on a continuing basis. In addition to catching more fish, you’ll make new friends and better appreciate living in PGI. Good luck, stay safe and welcome to the club.
(Back to Content_Links)
January 2013
Gathering “Other” Bait by Jim Qurollo
Need some varied bait for your sheepshead fish-of-the-month fishing this month? The simplest thing is to drive north across the bridge to Fishin’ Franks or south to Rio Villa Bait and Tackle, buy a few dozen fiddler crabs and support one of our sponsors. But, what can be a more fun alternative is to catch some local mud or rock crabs (the names “mud” and “rock” seem to be used interchangeably from what I’ve read and heard) along the Harbor shoreline, especially if you have a kid or two along to help.
Try taking some gloves, a small bucket or other container to hold the small crabs and maybe a small tool like a potato rake or similar and heading to the harbor shoreline at low tide. The gloves are to prevent cuts from the very sharp (voice of experience speaking here for sure) oyster shell encrusted shoreline rocks, and the potato rake makes it easier to turn those rocks over. In order to find the crabs, you need to be on a shoreline that has lots of exposed rocks with oysters.
As you move through the low tide uncovered shoreline rocks—being very careful to not trip/slip/fall—turn them over and watch for the small 1-inch to 2-inch dark gray mud crabs that hide under the rocks. Be sure to look on the bottom of the upended rocks too because the little crabs will cling there and you’ll miss them. The crabs are not very evasive or quick and pretty easy to catch with your hands. Drop them into the bucket and before very long you will have a nice mess of crab bait that sheepshead and other Harbor fish like.
If you’re not familiar with using small crabs like mud crabs or fiddler crabs for bait, Fishin’ Franks will provide a good description of how to hook them, type of hooks to use and how to fish with them.
A couple of words of caution:
- Baby stone crabs look similar to the mud crabs. It is illegal to possess a stone crab of any size and can result in a ticket. Before you go collect mud crabs, be sure and Google something like “mud crab versus baby stone crab” and read some of the results on how you tell the difference.
- The larger (2-inch or so) mud crabs can pinch pretty hard, so be careful with them.
Give it a try. Gathering the bait crabs can be a fun experience, and some fishermen swear by them as one of the best native baits.
(Back to Content_Links)
April, 2013
Cast Net Primer By Jim Qurollo
To catch quantities of “white bait” (generally green backs or threadfins) around Charlotte Harbor, in most cases you need to be able to throw a cast net. If you don’t know how to do that, there are many ways to learn. Probably the best is from someone who has been doing it for a while and has perfected their technique, like some of our club experts. Another good way to start and also refresh, is to watch YouTube videos and practice with a net in your yard.
Learning to Throw. On YouTube you can find demonstrations and explanations of many different ways to throw a cast net…some might suit you and others not. Over the years I’ve used different methods but have settled on one that seems to suit me best. Here is one YouTube video that demonstrates that method: https://www.youtube.com/watch?v=Le6P2nFZhsA (Depending on what app you are using to read this, you can click on the above link, or you might need to copy and paste the link into your browser, or you can go to www.pgifishingclub.org, select the Fishing Club Web Links page and click on the “How to Throw a Cast Net” link.) You can also Google “how to throw a cast net” and see many other examples. Some things to consider when looking at throwing methods are: holding lead line of the net in your teeth prior to throw or not, net over your shoulder or not (you can get pretty wet after first toss), and just how complicated is a particular method. Often simple is better.
What Net to Buy. Once you have decided on a method you want to try when throwing your net, you need a cast net, and there are many different parameters to consider when selecting one. Things like size or overall diameter of the net, mesh size, amount of weight per foot of circumference and of course price. Generally, as with most things you “get what you pay for.” Larger nets, finer mesh, more lead, higher quality material…all increase the price. You can buy cast nets that will work at Wal-Mart for less than $50. These are OK to start with. But, if you use a cast net frequently, you’ll eventually want a better quality, more expensive net which you can get from most of our tackle selling sponsors for three to four times that much. These higher quality nets are easier throw well and usually catch more bait. If you become a real pro at cast netting, you can spend many hundreds of dollars on top quality cast nets. You can get nets of colors other than white/clear monofilament. There are camo nets, green nets and blue nets. I’m not sure that the color makes much difference, but some cast netters feel that the colored nets spook the bait less and even go so far as to dye their standard white nets before using them. (One good thing everyone should do before using a new cast net is soak it overnight in a fabric softener solution. Makes it mores supple and easier to throw.)
Parts of a Cast Net. If you’re interested, the basic parts of a cast net are:
- Hand line—a rope attached to the swivel at one end and the casters wrist at the other;
- Swivel—two metal loops that turn to keep twist out of the net and help let it spin on throwing;
- Horn—a ring, usually plastic, just below the swivel where the top or center of the net is tied;
- Brail lines—lines, usually heavy mono, attached to the swivel at one end and the lead line at the other. Their function is to pucker the net on retrieval and trap the bait;
- Lead line—a small diameter rope with lead sinkers attached. It is fixed to the outside circumference of the net to make it sink;
- Netting—made from nylon multifilament or monofilament to form the net of the desired mesh.
Net Size. Nets are normally sized by radius. In other words, an “8-ft net” is 8-ft in radius or if thrown perfectly it makes a 16-ft diameter circle. Since the area of a circle is calculated using the radius squared, a 10-ft cast net for example will cover four times the area of a 5-ft cast net. So, obviously bigger is much, better, right? Maybe not. Bigger nets catch more bait per throw…provided you can throw them well and often. But sometimes, for many of us “older” folks, we’re better off with a net we can throw with confidence than one we can’t get to open consistently or throw more than a couple of times without wearing ourselves out.
You might consider “smaller” nets to be 5 to 6-ft, “medium” 7 to 9-ft and “large” 10-ft and above. I’ve found that I can throw my son’s 10-ft net and get it to open OK, but it weighs so much (the larger the net the more lead it has) that after a couple of throws I’m ready to quit. So, I settled on 8-ft as a good compromise for me. It covers a decent area and I can normally throw it as many times as necessary to catch as much bait as needed.
What about mesh size? Mesh size is the distance from knot to knot in the net. Typical bait net mesh sizes used in Charlotte Harbor to catch white bait are 1/4-inch and 3/8-inch, but sizes range up to over 1-inch if you are after large mullet or the like. Obviously, the smaller the mesh size, the smaller the bait you can catch without the bait escaping through the net or getting caught up in the mesh like a gill net (sometimes called “Christmas treeing”). Of course the small mesh will also catch larger bait, but the main disadvantage of too small a mesh is a slower sink rate, and they are generally more expensive since they use more net material, have more knots, etc. So, for catching typical white bait in Charlotte Harbor the 3/8-inch mesh is a good starting size and is often better for throwing in deeper water since it sinks faster than the 1/4-inch. Ideally, you might have both 1/4-inch and 3/8-inch size nets available depending on the size of bait you are targeting or expecting. If the bait is running small (2 to 3 inches) the problem of having many bait fish stuck in the mesh of the 3/8-inch net when you retrieve it gets to be irritating when you try to remove them, and you lose bait that dies in the net.
Personally, I have three cast nets, and typically use two of them. One inexpensive small 6-foot, 3/8 mesh net that I keep onboard as a backup. One good quality 8-foot, 3/8 mesh and one higher quality 8-foot, 1/4 mesh to use depending on expected bait size and water depth I’ll be targeting.
One more word on mesh size: 1/4 inch and 3/8 inch are somewhat misleading. As mentioned, this is a knot to knot measurement. The small mesh squares are not really square except when the net is held in one particular position which you rarely see. The small “squares” actually turn into “stretched squares” when the net is held, thrown and retrieved, and the measurement across the longest diagonal is often near twice the mesh size (3/8 inch turns into 3/4 inch). So it is fairly easy for 3-inch long and less white bait to get heads and gill covers through the mesh and be entangled. No fun.
Where to Catch Bait? Good question, and I can only speak from my experiences the past three years of catching bait on Charlotte Harbor.
During the warm water months, I much prefer chumming for green backs (scaled sardines) over eel grass in the 2-3-foot water just inside, outside and on the bars. Here are some spots to try:
- Both sides of the bar near Pirate Harbor entrance channel are often good;
- Inside the bar south of Alligator Creek can be good;
- Jug Creek Shoal north and west of Bokeelia usually has some of the best areas;
- Over grassy areas just outside the bar on the west wall;
- Around grassy areas with potholes anywhere there is moving water.
When chumming using the typical tropical fish food and menhaden oil mixture, it is important to remember that for the best chance to find bait you need moving tide to disperse the chum down-tide and attract the bait. Also, when chumming in the above listed areas during the warm water months, you will usually attract and catch pinfish, puffer fish, 6 to 10-inch ballyhoo, various other fish and cormorants. The pinfish you’ll catch can be very good bait for both inshore and offshore, and they are one of the hardiest baits available. You can keep them in a “bait motel” at your dock for a lengthy period. They’ll also eat your shrimp if you keep them in the same livewell. The ballyhoo are decent cut bait. Although chumming doesn’t attract threadfins, you will sometimes net them at the same time as greenbacks when they happen to be swimming together.
You can also catch bait in somewhat deeper areas of the Harbor, mainly near some of the markers. During the colder water months these are probably about the only areas where you can reliably catch bait. The bait you catch in the 11 to 13-foot water near the markers like #1 and #2 will often be mixed green backs and thread fins of various sizes. But some seasons of the year you can fill your baitwell with one throw of the net. Usually you don’t need to chum around the markers, but sometimes it helps to concentrate the greenbacks. Throw near the marker and let the net sink to or near the bottom.
If you’ve been blind throwing around a marker and not having much luck, try using your sonar. The bait around the markers is usually pretty well “schooled up” and in the lower half of the water column. You can easily see and catch the pods of bait if you have a depth finder and get the hang of throwing your net where the pod is as you pass over it. I have caught large amounts of bait in the spring and early summer idling or drifting hundreds of yards from a marker, watching for pods of bait on the sonar and throwing my net. And always watch for diving pelicans which will mark schools of bait near the surface. Motor over near them and if the bait goes deeper use your sonar to locate them. Try it, practice and you can usually catch a decent amount of good bait.
Cast Net Cautions. A couple of words of caution, especially when throwing your net in the deeper water areas.
Near marker #1 I destroyed a cast net by snagging it on a bottom obstruction of some sort. I’ve not had a problem at marker #2 with bottom snags, but there must be some because once while pulling in my anchor, I snagged and recovered an old cast net near the marker. Letting your net sink to the bottom in deep water is always a risk.
Many experienced cast netters are careful about how they attach the hand line to their wrist prior to throwing. If you are drifting over bait, letting the net sink to the bottom and it snags, or even if you are anchored and it happens to ensnare some very large fish, you can be pulled overboard if you can’t quickly release the hand line. A good option is to use a Velcro strap instead of the loop at the end of the hand line to secure it to your wrist so it is easily released if necessary.
Finally. Here are two of your primary cast net targets.  They are easy to tell apart. The greenback (aka scaled sardine) has a larger head and eyes than the threadfin and is the preferred bait if you have a choice. The threadfin gets its name from the long, thread-like back ray of the dorsal fin. The greenback will stay alive in your baitwell all day, stay active on your hook, will come to chum and is like candy to snook. The threadfin is a good bait, is not as hardy or as active as the greenback, doesn’t come to chum but often grows to a larger size than the greenback. Most Charlotte Harbor game fish like them both very much.
And if you have questions about catching Charlotte Harbor bait with a cast net, many of our experienced club members can help. Just ask.
(Back to Content_Links)